Guide to Download, Install and Configure Java in Windows Computer
Configure Java in Windows Computer: If you want to develop with Java, you have to install and configure Java JDK (Java Development Kit) along with JRE (Java Runtime Environment) in your Windows PC. Are you troubling to configure Java on your PC? Don’t worry I’m here to help you with the complete guide to download, install and configure Java in Windows Computers.
If you want to run Java programs on your computer you don’t have to install an configure Java JDK, you just need to install the JRE. But if you have to develop, compile and execute java programs you must download, install and configure Java JDK on your Windows computer.
Complete Guide to Download, Install and Configure Java in Windows
Let’s see how to download the JRE and JDK from Oracle’s website.
How to Download Java?
Here is how to download the Java JRE and Java JDK for your computer from the Oracle’s website.
Step 1: Visit the Oracle Java website using the link given: Download Java SE.
Step 2: To download the Java JDK, click on Download JDK (1 in the image) button.
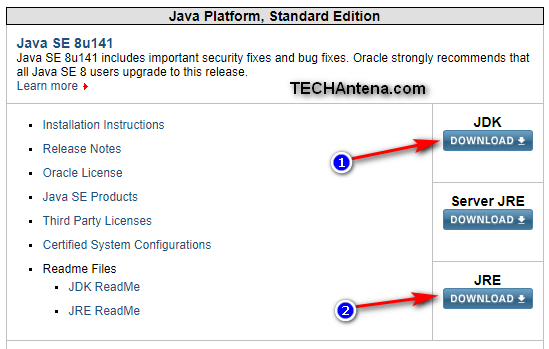
Step 3: Accept the License Agreement. Then find your download, choose between Windows x86 for 32-bit computers, and choose x64 for 64-bit computers.

Step 4: Once you downloaded the Java JDK. Now click on Download JRE (refer image in step 2).
Step 5: Choose in between Windows x86 offline and Windows x64 offline according to your computer.

How to Install Java?
Once you have successfully downloaded the Java JDK and Java JRE you have to install them.
To install the Java JRE right click on the downloaded file (jre-8u141-windows-x64) and choose open. Then follow the given instructions.
Do the same steps for installing Java JDK.
How to Configure Java JDK in Windows?
Now you have successfully downloaded and installed the Java JRE and Java JDK on your Windows computer. Now we have to configure Java JDK in order to start developing or learning with Java. This is important configuring the Java JDK.
Some of the computers need to be manually configured the Java JDK if the installation directory is automatically detected by the system.
Check Whether Your Computer Has Correctly Configured the Java
Step 1: Open the command prompt on your computer.
Step 2: Now type the following command in the CMD.
Command: javac -version
Step 3: If your system has already configured the Java JDK, you will get the version of the Java printed. If not don’t worry follow the below steps.
Configuring Java JDK
Step 1: Press the Windows Key and the X key together and select the System from the list.
Step 2: Now from the left side-panel click on the Advanced system settings.
Step 3: Now navigate to the Advanced tab and click on the Environment Variables.

Step 4: Here you can edit your system variables. From the System Variables click on Path and then click Edit.

Step 5: Now find the Java installed folder. This is usually found in the Program Files (for Windows x64) folder and for Windows, x86 go to Program Files (x86) folder. And open the Java folder.
Step 6: From the Java folder, open JDK folder, and from the JDK folder go to the bin folder.
Step 7: Once you opened the bin folder, copy the address of the bin folder from the address bar as shown in below screenshot. (Right click on the address bar to copy the address.)

Step 8: Now go back to the step 4, in the window edit environment variable, click new and paste the bin folder’s address in the path field.

Step 9: By clicking the OK button you have done.
If you have any ddoubts, feel free to comment below.